- پروگرامرها
- دما و رطوبت
- سایر ماژول ها
- سنسور بخار سرد
- کی پد و جوی استیک
- ماژول GPS-GPRS
- ماژول رله و سوییچ
- ماژول شبکه
- ماژول نمایشگر
- ماژول های RF
- ماژول های RFID
- ماژول های پخش صدا
- ماژول های پردازش تصویر
- ماژول های تاریخ و ساعت
- ماژول های تغذیه – ولتاژ – جریان
- ماژول های ذخیره داده
- ماژول های شتاب سنج و ژیروسکوپ
- ماژول های مبدل
- ماژول های محافظ شارژ باتری
- ماژول های مولد پالس
- ماژول ولتمتر و آمپرمتر


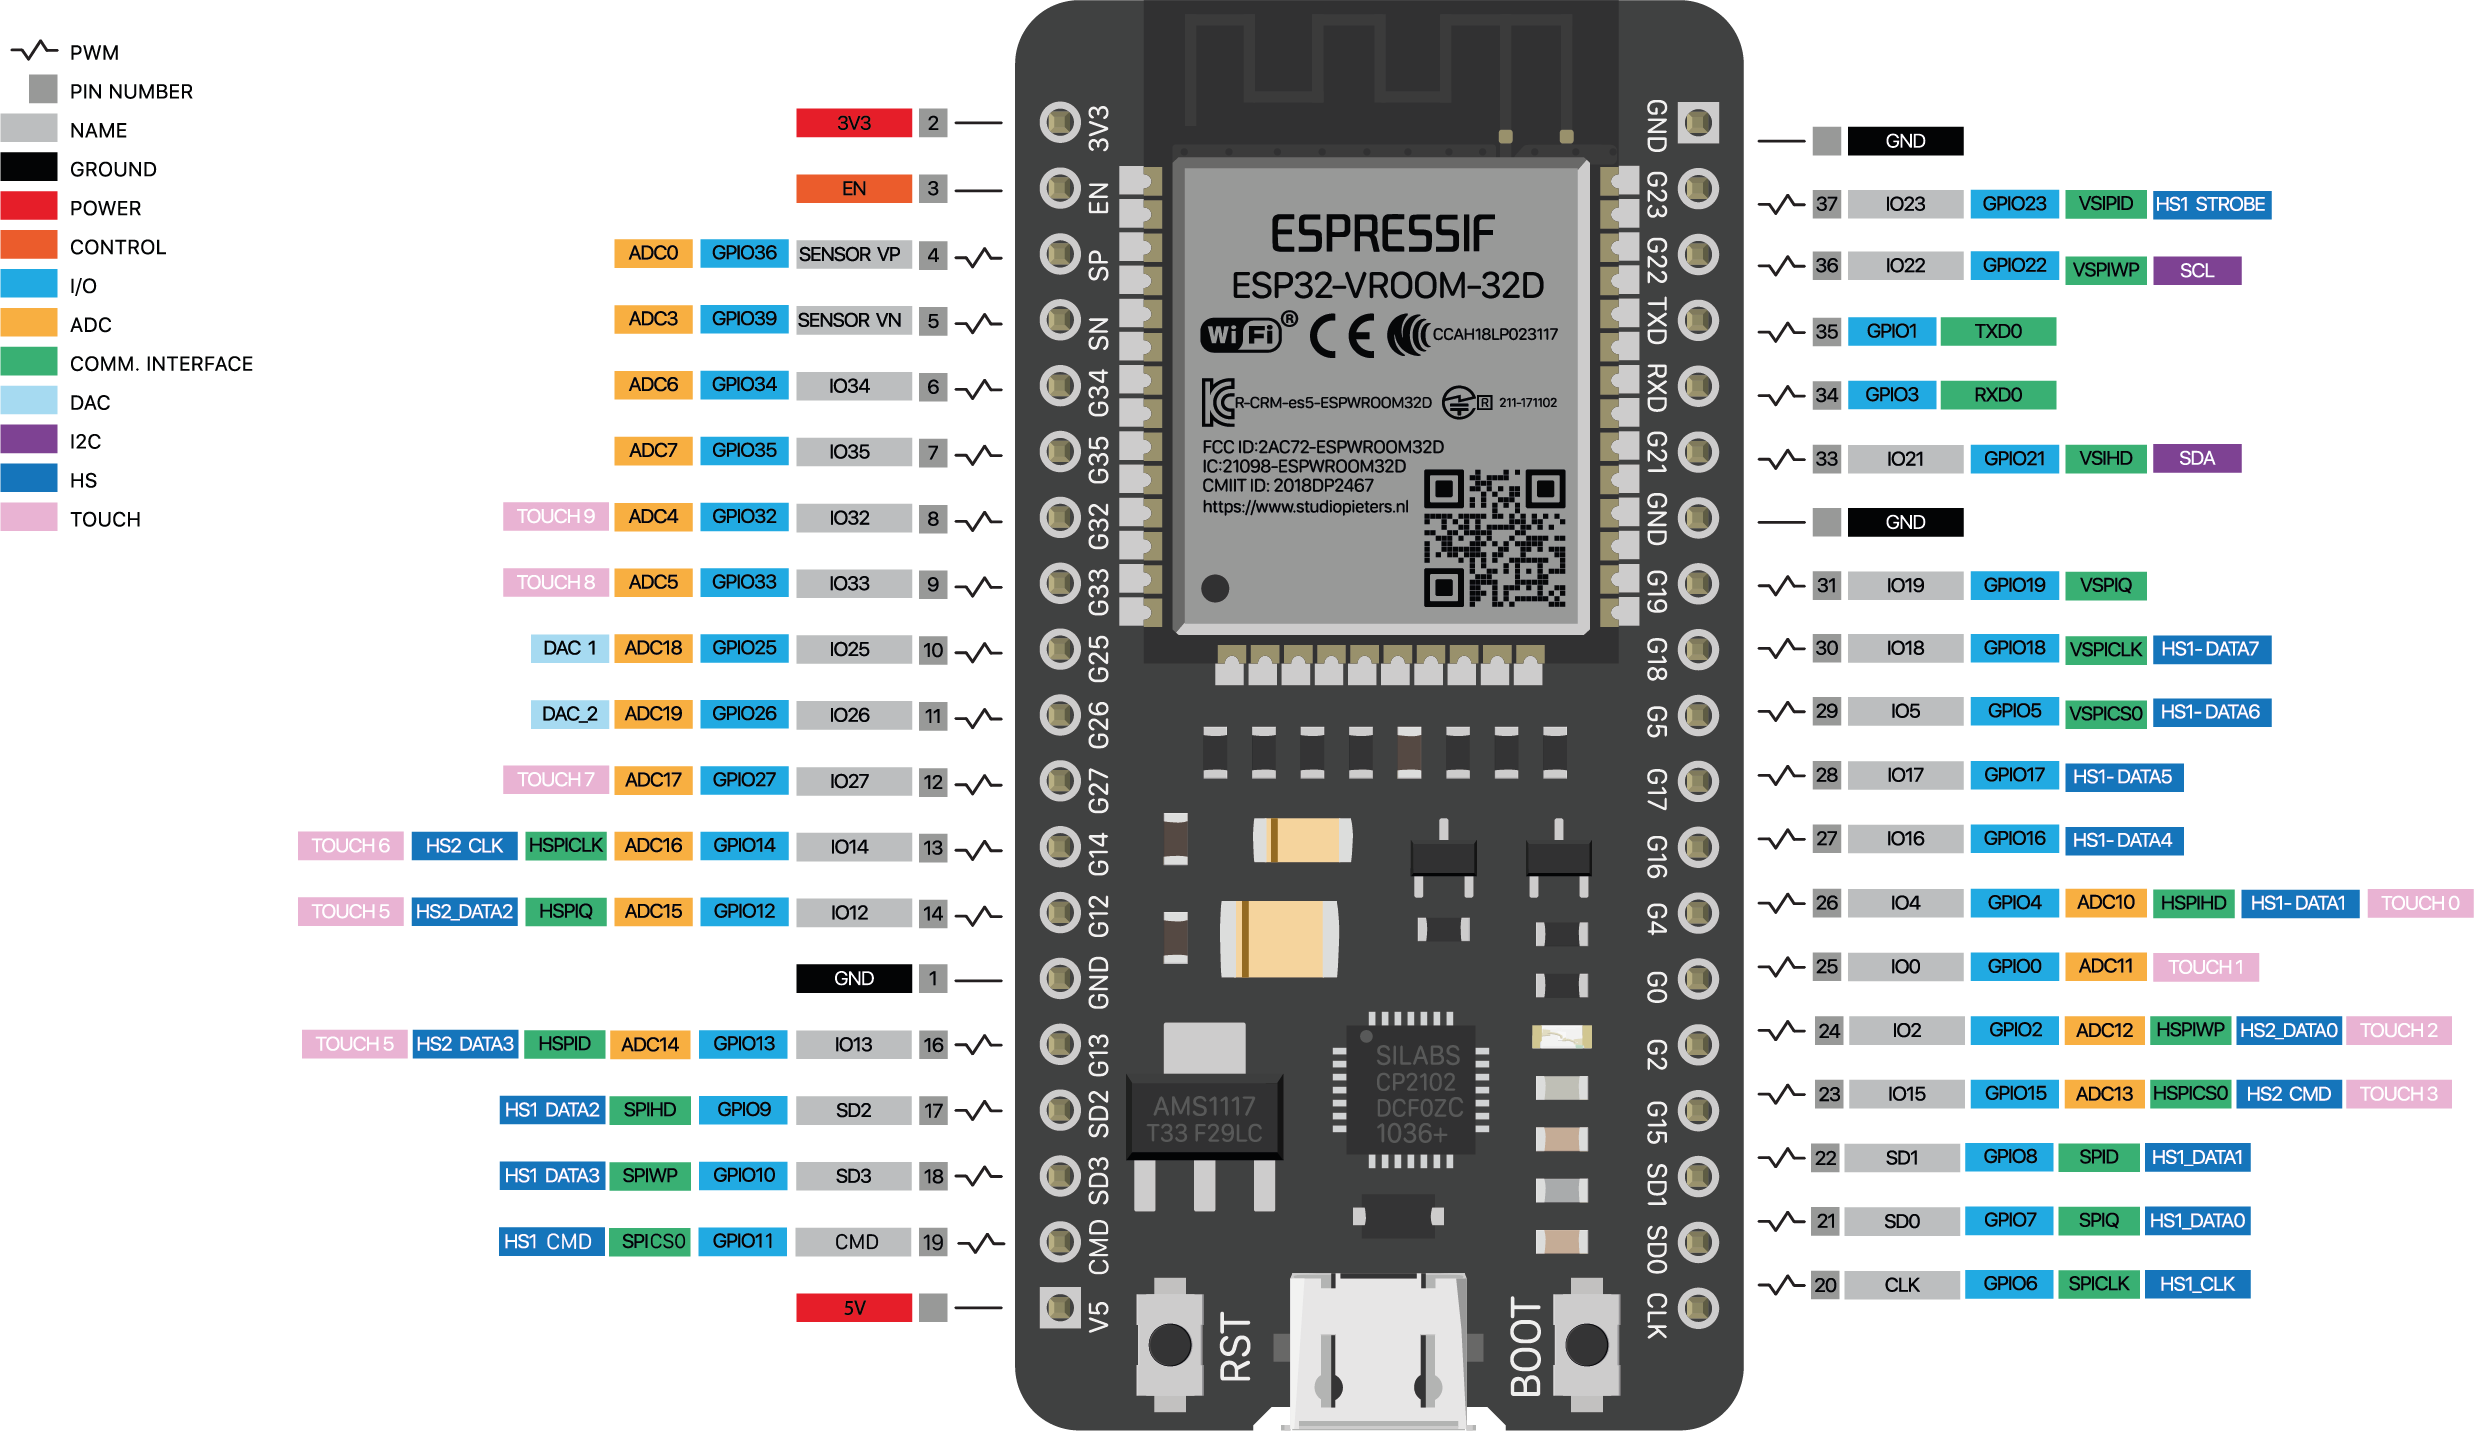
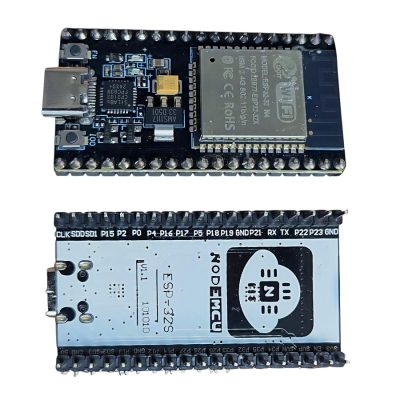
برد توسعه NodeMCU ESP-32S با مبدل CP2102 دارای بلوتوث و وای فای داخلی 38 پایه با رابط USB Type-C
14
نفر در حال مشاهده این محصول هستند!
توضیحات
38Pins Type-C ESP32S CP2102 Development Board 2.4GHz Dual-Core WiFi +Bluetooth Microcontroller for Arduino
ESP-32S development board WIFI networking smart component
Product introduction
The core of the ESP32 is integrated with traditional, low-power BT and WiFi.
It adopts the same board design of ESP DEVKIT and is compatible with NodeMCU (NodeMCU-32S).
It features a low-power 32-bit single/dual-core processor
supporting clock frequencies up to 240MHz.
Onboard PCB antenna with multiple wireless certifications.
The module uses ESP32-WROOM-32, FLASH capacity up to 4M Byte, it also integrates a wealth of peripherals, including capacitive touch sensors, Hall sensors, low noise sense amplifiers, SD card interface, Ethernet interface, high speed SDIO /SPI, UART, I2S, and I2C.
SPECIFICATIONS AND FEATURES
1.Type: Wifi + Bluetooth Module
2.Model: ESP32 38 Pin
3.Power Voltage (USB): 5V DC
4.Input/Output Voltage: 3.3V DC
5.5μA power consumption in sleep mode
6.Main CPU: Tensilica Xtensa 32-bit LX6
7.Clock Frequency: up to 240Mhz
8.Secondary processor: Allows basic operations in ultra-low power mode
9.Wi-Fi: 802.11 b/g/n/e/i (802.11n @ 2.4 GHz up to 150 Mbit/s)
10.Bluetooth: 4.2 BR/EDR BLE Dual control mode
11.Memory: 448 KByte ROM, 520 KByte SRAM, 6 KByte SRAM in RTC and QSPI supports multiple flash chips / SRAM
12.USB-Serial Chip: CP2102
13.Antenna on PCB
14.Digital GPIO Pins: 24 (Some pins only as input)
15.Digital Analog Converter: Two 12-bit SAR type ADC, supports measurements in up to 18 channels, some pins support an amplifier with programmable gain
16Security: IEEE 802.11, including WFA, WPA/WPA2 and WAPI
17.Hardware accelerated cryptography: AES, SHA-2, RSA, Elliptic Curve Cryptography (ECC), Random Number Generator (RNG).
RESOURCES
Datasheet – ESP32-WROOM-32 SMD
Function diagram – ESP32
Application
1. Universal low power IoT sensor hub.
2. Home automation.
3. Universal low power IoT recorder.
4. Mesh network.
5. Video streaming of the camera.
6. Industrial wireless control.
7. OTT TV box / set-top box device.
8. Baby monitor.
9. Smart Socket.
10. Sensor networks.
11. Wi-Fi toys: Counters, toys, Anti-lost device.
12. Wearable electronic products.
13. Wi-Fi speech recognition device.
14. Wi-Fi location-aware devices.
Introduction of how to use
To start using this board and programming it from the PC or Laptop you must install its driver, in this case the board incorporates the CP2102 chip which is responsible for programming and establishing USB-Serial communication.
In the following link you can download the CP210x universal controller which includes the CP2102 version that the board needs:
CP210x Universal Controller
Note
Install the driver according to the operating system of your PC or Laptop.
If you have installed it previously, do not install the driver.
Once the driver is installed, you can connect the board to your PC.
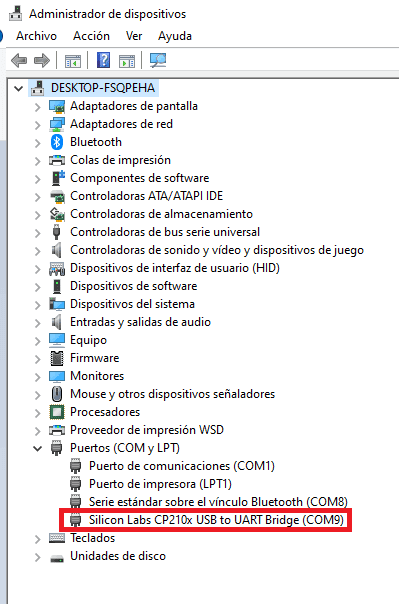
To verify that the driver was installed correctly and a COM port was assigned to the board, follow these steps:
Open “Device Manager”
Connect the board to the PC
Click on Ports (COM, LPT)
You should recognize the plate as shown in the following image:
How to program ESP32 ?
Once the controller is installed, you can program it in different programming environments, you can choose:
Arduino IDE (in C++ language),
Esp-idf (Espressif IoT Development Framework) developed by the chip manufacturer,
Simba Embedded Programming Platform (in Python language)
MicroPython
Javascript (Espruino, Duktape, Mongoose JS)
And others…
It is widely used with Arduino IDE since it has a wide variety of examples, information and other resources that will help you start using this board.
To use with Arduino IDE you must perform the following steps:
Open Arduino IDE.
If you have not installed it, download it directly from the Arduino page , install the executable version, not install the portable version.
Copy the following URL: https://dl.espressif.com/dl/package_esp32_index.json
Go to the Arduino tab called “File”.
Click on “Preferences”.
Go to the Additional Card URL Manager:
In the box paste the URL. If there is another URL, place a comma at the end, give a space and paste the URL.
Click Ok.
Go to the Arduino tab called “Tools”
Click on “Plate:” and then “Card Manager…”
A window will appear, look for the “esp32 by Espressif Systems” boards and install them.
To check the installation of ESP32 cards in Arduino IDE and upload codes to the board, do the following:
Go to the Arduino tab called “Tools”
Click on “Plate:”
Select ESP32 Arduino and search for the board “DOIT ESP32 DEVKIT V1”
You can also choose the boards: NodeMCU-32S , Adafruit ESP32 Feather or ESP32 Dev Module
Then connect the board to the PC.
Go to “Tools” again , select the “COM” port that the PC assigned to the board and verify that Flash Mode is set to DIO.
To check that everything went well, I recommend doing the “Hello world in ESP32” which consists of ordering a Blink code, which only turns an LED on the ESP32 on and off.
Note
If the program does not load directly to the board you will have to put the board in programming mode before loading the code.
To put it in programming mode, do the following
Press the “BOOT” button when the code is being uploaded Since the loading process begins, stop pressing the BOOT button.
You will have to do this process every time you upload a new sketch to the ESP32.
نظرات (0)

دیدگاهها
هیچ دیدگاهی برای این محصول نوشته نشده است.