- پروگرامرها
- دما و رطوبت
- سایر ماژول ها
- سنسور بخار سرد
- کی پد و جوی استیک
- ماژول GPS-GPRS
- ماژول رله و سوییچ
- ماژول شبکه
- ماژول نمایشگر
- ماژول های RF
- ماژول های RFID
- ماژول های پخش صدا
- ماژول های پردازش تصویر
- ماژول های تاریخ و ساعت
- ماژول های تغذیه – ولتاژ – جریان
- ماژول های ذخیره داده
- ماژول های شتاب سنج و ژیروسکوپ
- ماژول های مبدل
- ماژول های محافظ شارژ باتری
- ماژول های مولد پالس
- ماژول ولتمتر و آمپرمتر


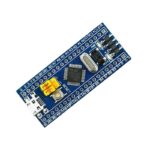

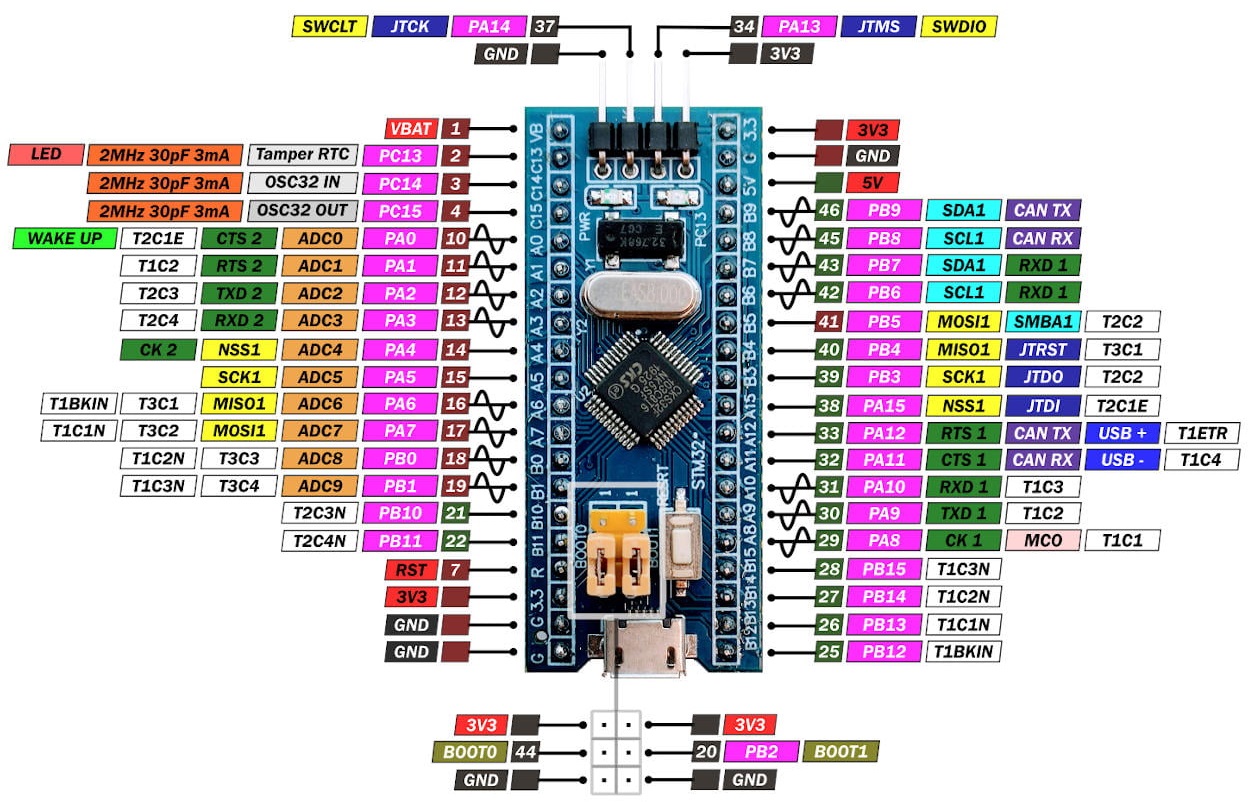
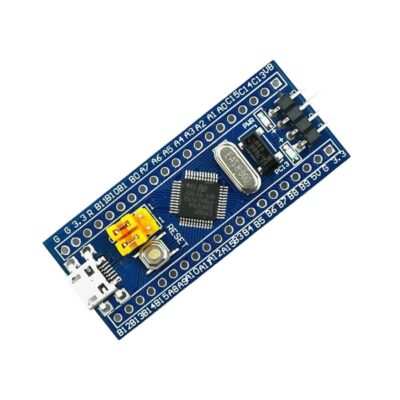
هدر برد STM32F103C6T6
23
نفر در حال مشاهده این محصول هستند!
توضیحات
This is STM32F103C6T6 Development Board STM32 ARM Core Module.
This board is a low-cost Minimum System Development Board for ARM Microcontroller STM32F103C6T6. Board is suitable for learners that want to learn the STM32 microcontroller with ARM Cortex-M3 32-bit core.
Board is suitable for learners that want to learn STM32 microcontroller with ARM Cortex-M3 32-bit core.
SPECIFICATIONS
With respect to the STM32F103C8T6, It has less Flash and SRAM, one less timer, and one less Serial.
| STM32F103C6T6 | STM32F103C8T6 | |
|---|---|---|
| Flash | 32K | 64K |
| RAM | 10K | 20K |
| Timer | 3 (No timer 4) | 4 |
| Serial port | 2 (No serial port 3) | 3 |
| I2C | 1 | 2 |
| SPI | 1 | 2+ |
ARM 32-bit Cortex™-M3 CPU Core
1. 72 MHz maximum frequency,1.25 DMIPS/MHz (Dhrystone 2.1) performance at 0 wait state memory access
2. Single-cycle multiplication and hardware division
Memories
1. 16 or 32 Kbytes of Flash memory
2. 6 or 10 Kbytes of SRAM
Clock, reset and supply management
1. 2.0 to 3.6 V application supply and I/Os
2. POR, PDR, and programmable voltage detector (PVD)
3. 4-to-16 MHz crystal oscillator
4. Internal 8 MHz factory-trimmed RC
5. Internal 40 kHz RC
6. PLL for CPU clock
7. 32 kHz oscillator for RTC with calibration
Low power
1. Sleep, Stop and Standby modes
2. VBAT supply for RTC and backup registers
2 x 12-bit, 1 μs A/D converters (up to 16 channels)
1. Conversion range: 0 to 3.6 V
2. Dual-sample and hold capability
3. Temperature sensor
DMA
1. 7-channel DMA controller
2. Peripherals supported: timers, ADC, SPIs, I2Cs and USARTs
Up to 51 fast I/O ports
1. 26/37/51 I/Os, all mappable on 16 external interrupt vectors and almost all 5 V-tolerant
Debug mode
1. Serial wire debug (SWD) & JTAG interfaces
6 timers
1. Two 16-bit timers, each with up to 4 IC/OC/PWM or pulse counter and quadrature (incremental) encoder input
2. 16-bit, motor control PWM timer with dead-time generation and emergency stop
3. 2 watchdog timers (Independent and Window)
4. SysTick timer 24-bit downcounter
6 communication interfaces
1. 1 x I2C interface (SMBus/PMBus)
2. 2 × USARTs (ISO 7816 interface, LIN, IrDA capability, modem control)
3. 1 × SPI (18 Mbit/s)
4. CAN interface (2.0B Active)
5. USB 2.0 full-speed interface
CRC calculation unit, 96-bit unique ID
PACKAGE INCLUDES
1 x STM32F103C6T6 Minimum System Development Board STM32 ARM Core Module
DOCUMENTATION AND RESOURCES
STM32duino-bootloader
ST-LINK drivers
STM32 ST-LINK utility
TUTORIALS
How to program STM32F103C6T6 with Arduino IDE using STLINK
Configuring Arduino IDE to Program STM32F103C6T6 Blue Pill
I am sure you already have Arduino IDE installed on your PC (or Laptop).
If not, then install it first. After than open your Arduino IDE and select File -> Preferences.
You will find a tab called “Additional Boards Manager URLs”.
Copy the following link and paste it there.
https://github.com/stm32duino/BoardManagerFiles/raw/master/STM32/package_stm_index.json
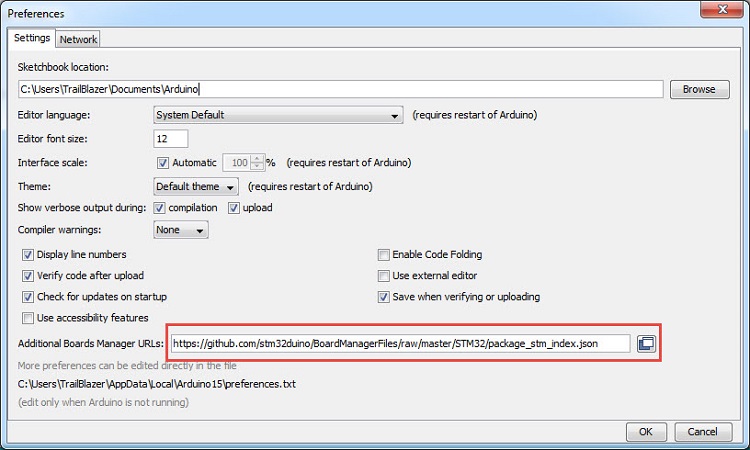
If you already have some URLs in this section, you can add more by separating them with comma.
After adding the URL, click on OK.
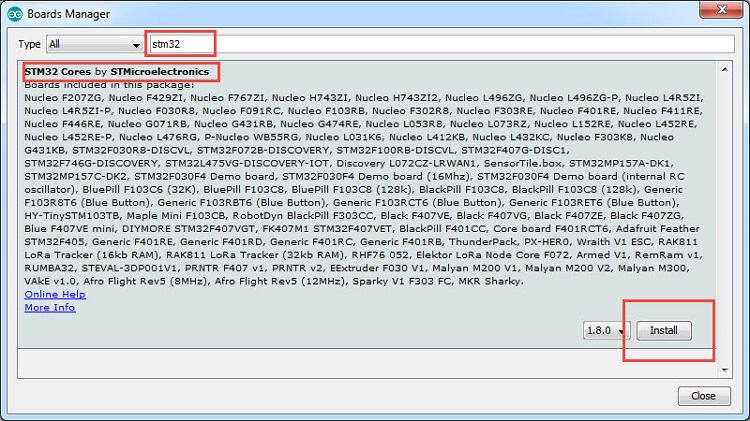
Now, go to Tools -> Board -> Board Manager… option and search for “stm32”.
You will get a result like “STM32 Cores by STMicroelectronics”. Install the latest version.
This will take some time as it will download and install some of the necessary files and tools.
(you have to download another tool from STMicroelectronics for this to work).
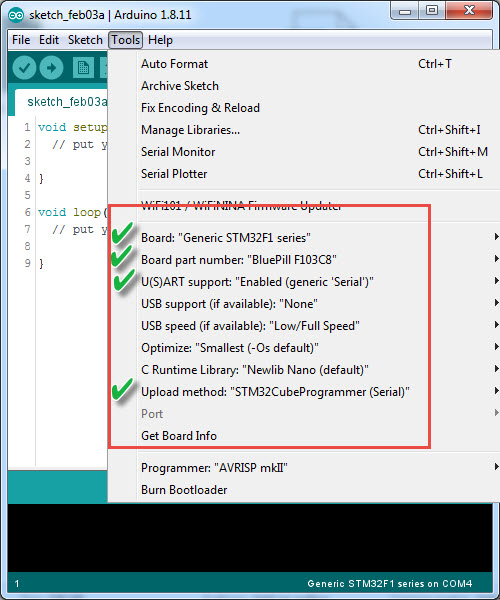
Now you can select the board from Tools -> Board -> Generic STM32F1 series.
Once you select this board, a bunch of options will appear below for customizing your board type.
The first important option is “Board part number”.
Make sure that “BluePill F103C8” is selected.
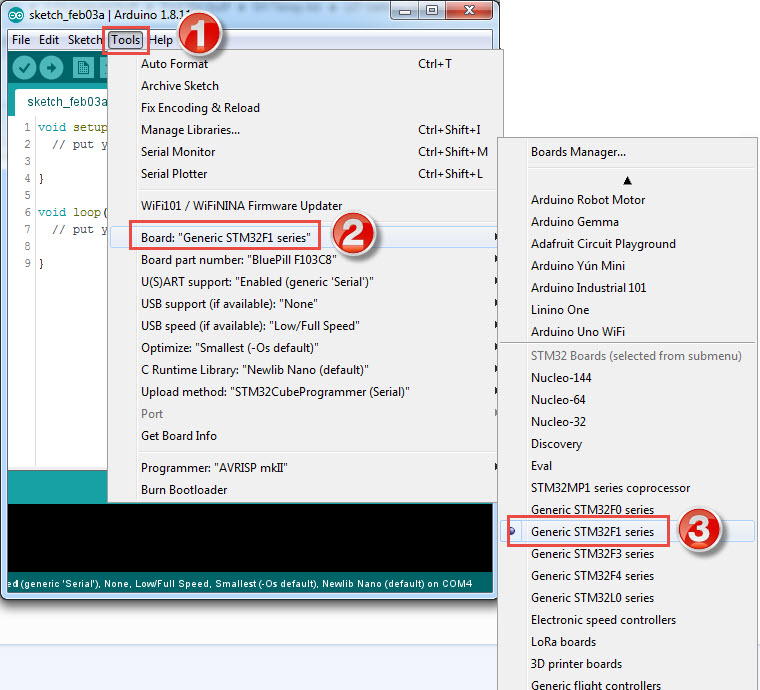
The other important options are “U(S)ART support”, make it as “Enabled (generic ‘Serial’)” and “Upload method”, make its as “STM32CubeProgrammer (Serial)”.
You can leave the remaining options as their default values.
How to install the driver for STLINK V2 ?
To start using this programmer, the first thing you must do is install the driver for this programmer to be recognized by your computer, in this case I will explain how to install the driver for computers that have WINDOWS 7, 8 and 10, perform the following steps:
1- Download the ST-LINK driver
2-Connect the STLINK to the computer.
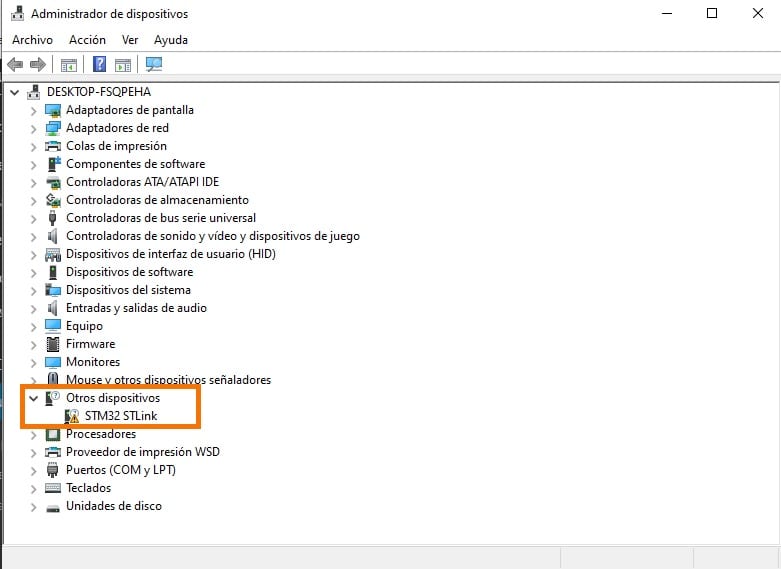
3- Open the “Device Manager” of windows and verify the status of the driver, it will come out as follows:
4- Since you downloaded the driver and verified the status of the driver, unzip the driver file and run the application called dpinst_amd64 for 64Bit systems and for 32Bits run the application dpinst_x86 .
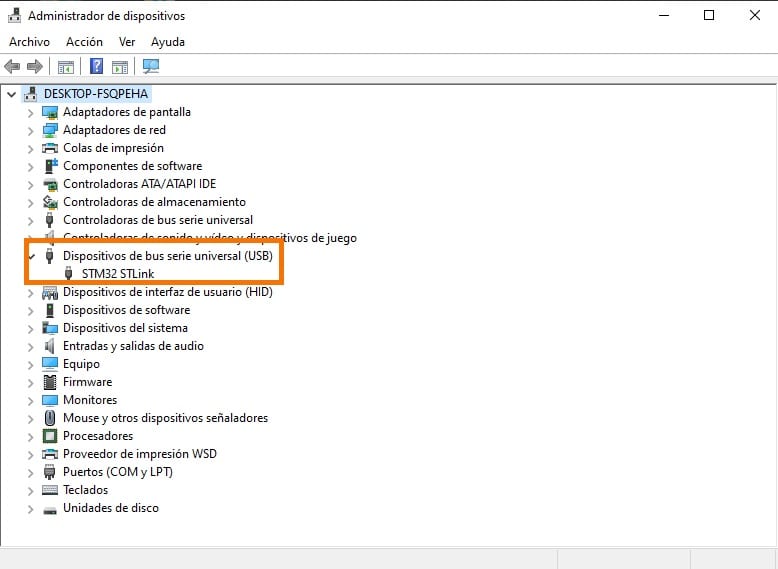
5- Check again in device manager the status of the controller and if it appears as shown in the image, STLINK is ready.
How to use the STLINK V2 with Arduino IDE?
Before loading your first code you will have to load the STM32 boards in Arduino IDE, follow these steps:
Open Arduino IDE.
If you have not installed it, download it directly from the Arduino page , install the executable version, do not install the portable version.
Copy the following URL: http://dan.drown.org/stm32duino/package_STM32duino_index.json
Go to the Arduino tab called “File”.
Click on “Preferences”.
Go to the Card Additional URLs Manager:
In the box paste the URL.
If there is another URL, put a comma at the end, give a space and paste the URL.
Click on Ok.
In the following video you will be able to guide yourself to correctly load the STM32 cards.
In case you have the ESP8266 or ESP32 cards loaded, you just have to give a space and paste the URL.
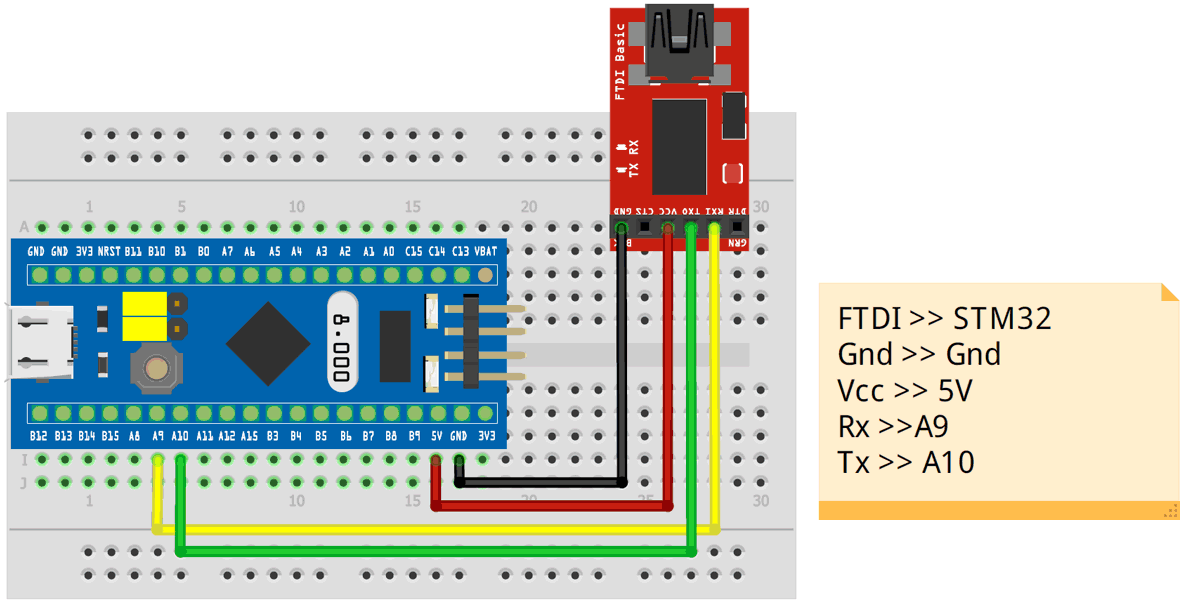
Connection with STLINK V2 and STM32F103C6T6
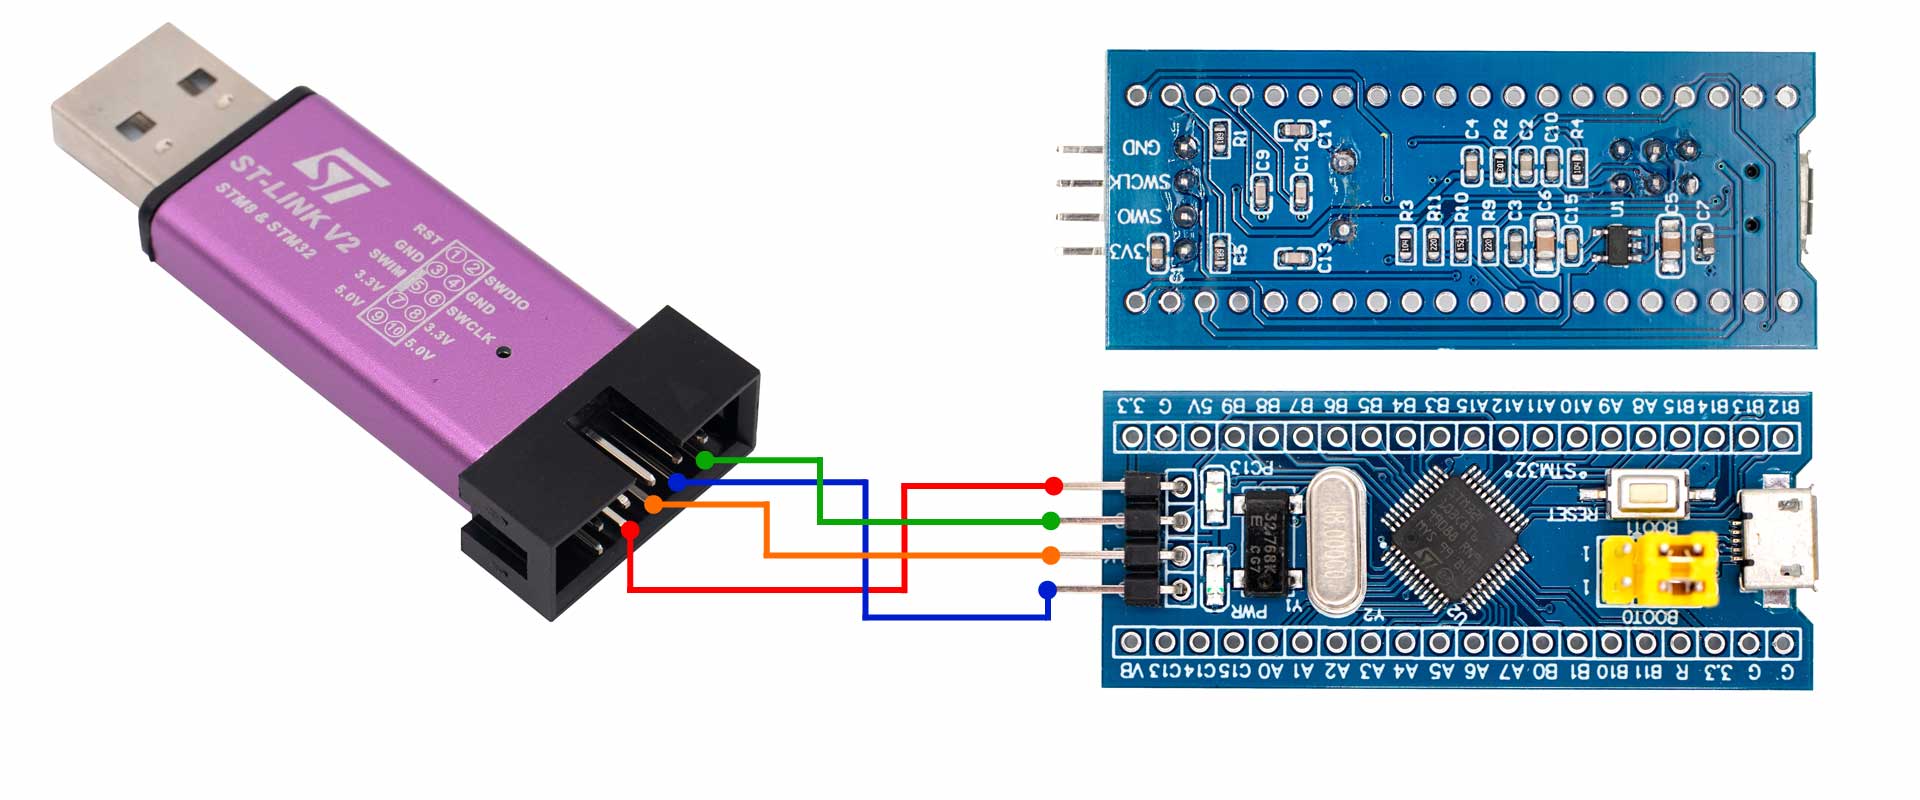
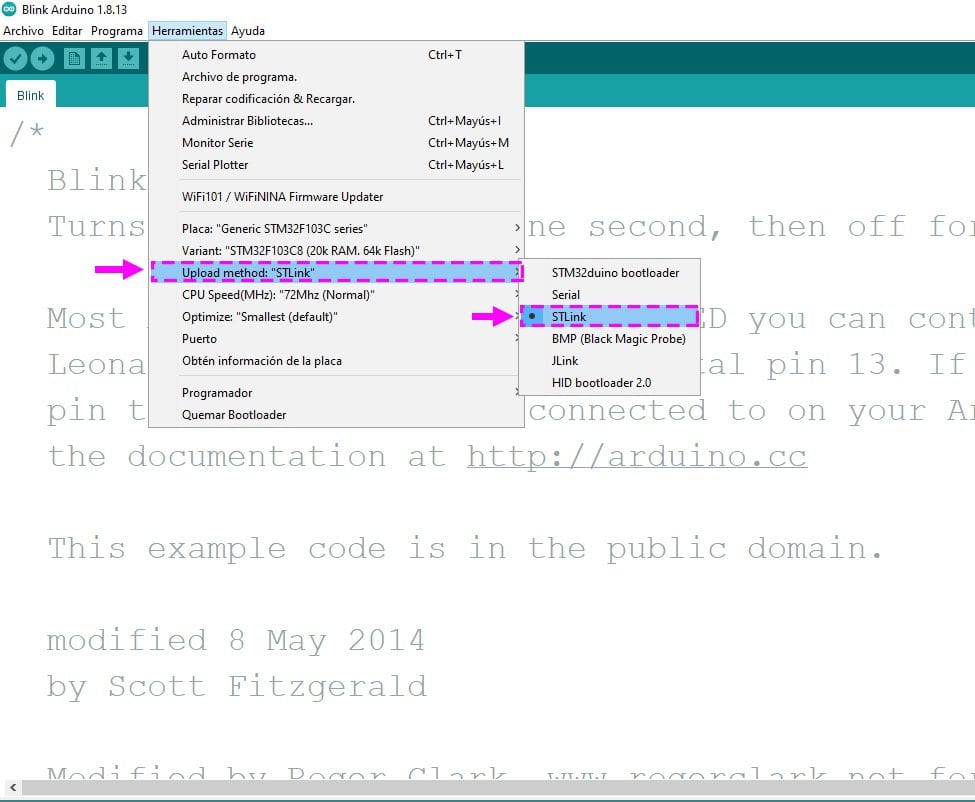
Once the connections are made, connect the STLINK V2 to your PC and in the Arduino IDE configure the following:
Go to the Arduino tab called “Tools”
Click on “Plate:”
Select STM32F1 Boards (Arduino_STM32) and look for the board “Generic STM32F103C Series”
After make sure to change the programming method select STLink
To program the board it will not be necessary to select a COM port
The configuration should be as shown below.
Load Blink Code – Hello World on STM32F103C6T6 Blue Pill:
Finally, copy and paste the following code and load it on the card.
void  setup () {
// initialize digital pin 2 as output
pinMode (PC13, OUTPUT );
}
 void  loop () {
digitalWrite (PC13, HIGH ); // Turn on the LED
delay (1000); // Wait a second
digitalWrite (PC13, LOW ); // Turn off the LED
delay (1000); // Wait a second
 }

And that's it, the test LED of the STM32F103C8T6 Blue Pill board will be lighting.
نظرات (0)
دیدگاهها
هیچ دیدگاهی برای این محصول نوشته نشده است.