- پروگرامرها
- دما و رطوبت
- سایر ماژول ها
- سنسور بخار سرد
- کی پد و جوی استیک
- ماژول GPS-GPRS
- ماژول رله و سوییچ
- ماژول شبکه
- ماژول نمایشگر
- ماژول های RF
- ماژول های RFID
- ماژول های پخش صدا
- ماژول های پردازش تصویر
- ماژول های تاریخ و ساعت
- ماژول های تغذیه – ولتاژ – جریان
- ماژول های ذخیره داده
- ماژول های شتاب سنج و ژیروسکوپ
- ماژول های مبدل
- ماژول های محافظ شارژ باتری
- ماژول های مولد پالس
- ماژول ولتمتر و آمپرمتر
")
")
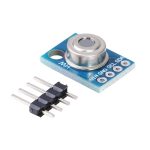
ماژول سنسور دمای مادون قرمز GY-906 MLX90614
25
نفر در حال مشاهده این محصول هستند!
توضیحات
Infrared Temperature Sensor GY-906 MLX90614
It is an MLX90614 infrared temperature sensor, it allows to measure the temperature of an object at a distance (without contact), which is designed to be sensitive to the infrared radiation emitted by an object at a distance, it can obtain readings from -70°C to 380°C, with an accuracy of 0.5°C.
The sensor output is linear and is compensated according to variations in ambient temperature.
The MLX90614 is used for high-precision non-contact temperature measurements and is applied in mobile air conditioning control systems, temperature control in industrial parts or household appliances, or temperature control using multiple sensors.
SPECIFICATIONS AND FEATURES
Type: Non-contact temperature sensor
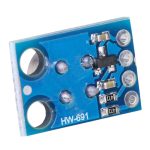
Module: GY-906/HW-961
Sensor: MLX90614
Operating Voltage: 3.3V – 5V DC
Working ambient temperature range: -40℃ to +170℃
Object temperature range: -70℃ to +380℃
Accuracy: ±0.5°C
Viewing angle: 90° (FOV)
Distance for object temperature: Min. 2cm and Max. 3cm
Built-in 17-bit ADC
PWM output: 10 bits
SMBUS (I2C) communication protocol
No additional components needed
Datasheet: MLX90614
Note
This sensor is not for medical or health applications, do not use to measure body temperature as you will get unrealistic readings.
How does it work
The MLX90614 sensor emits the temperature, but it does so in a very different way to conventional sensors, without any contact.
The only thing you have to do is point this sensor at the object whose temperature you need to measure, and it will measure the temperature radiated by the body or object when in contact with the environment.
It can be used by any microcontroller via I2C interface, it is compatible with Arduino, ESP8266, ESP32 and more boards.
This sensor comes mounted on a PCB, you just have to solder the male headers.
This way you can make connections between the sensor and the microcontrollers.
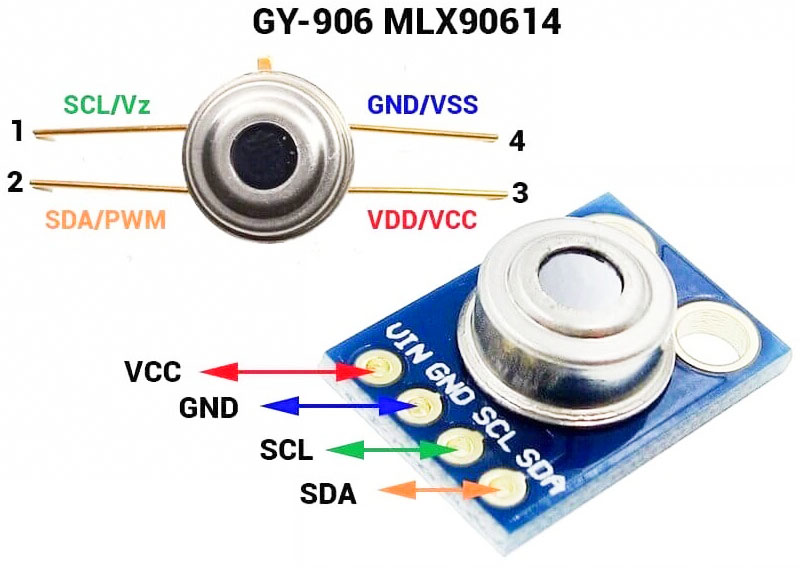
Pinout
How to program the MLX90614 sensor with the Arduino IDE and the ESP32 board
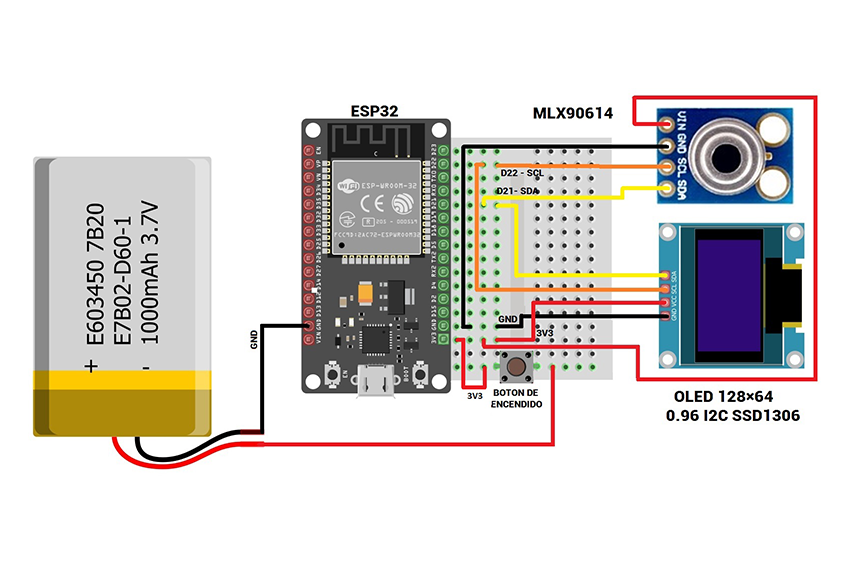
MLX9061 sensor how to connect to the ESP32 board
The MLX9061 sensor has 4 pins, the ground pin or GND, VCC power supply and the SCL – SDA pins.
To connect it to the ESP32 board you just have to connect the VIN pin to the 3.3v output of the ESP32, connect the GND pins to GND and connect the SCL and SDA pins to the pins that are reserved in the ESP32 to communicate via I2C.
The ESP32 has two I2C interfaces, in this case only one will be used, the ESP32 pins are:
D21 / GPIO21 / SCL and D22 / GPIO22 / SDA to these pins you must connect the MLX9061 sensor.
In the following image you can see how to make the connection between the ESP32 and the MLX9061 sensor:

How to program the MLX9061 Sensor with the Arduino IDE
To program the MLX9061 sensor with the Arduino IDE you will need to download the following library provided by Adafruit.
This library is very easy to use.
You can download the library from the following link.
Adafruit – MLX90614 – Library
Now that you have downloaded the library, open the Arduino IDE, go to the program tab and click on “Include Library” and a window will appear, select the “Add .ZIP library” option, then select the library you downloaded previously.
For this tutorial we will use the ESP32 board to read the temperature data every 1 second, using the serial monitor, but first you must have the ESP32 boards installed in the Arduino IDE, you can check how to do it by clicking Here, now that you have installed the ESP32 boards, remember to select the NodeMCU-32S board, check the COM port and then compile and upload the code to your ESP32.
#include <Wire.h>
#include <Adafruit_MLX90614.h>
Adafruit_MLX90614 mlx = Adafruit_MLX90614(); //Se declara una variable u objeto para el sensor
void setup()
{
Serial.begin(115200); //Se inicia el monitor serie a 115200 baudios
Serial.println("Iniciando test del MLX90614");
mlx.begin(); //Se inicia el sensor
}
void loop()
{
//Se imprimen los datos de sensor
  Serial.print("Temperatura Ambiente= ");
Serial.print(mlx.readAmbientTempC()); Serial.println(" °C");
Serial.print("Temperatura del Objeto= ");
Serial.print(mlx.readObjectTempC()); Serial.println(" °C");
  //Serial.print("Temperatura Ambiente = ");
  //Serial.print(mlx.readAmbientTempF()); Serial.println(" °F");
  //Serial.print("Temperatura del Objeto = ");
  //Serial.print(mlx.readObjectTempF()); Serial.println(" °F");
Serial.println();
  delay(1000);
}
Thermometer with MLX90614 + ESP32 + 128×64 Oled
Download and add libraries for the Oled Display
The first thing you need to do is download and import two libraries to the Arduino IDE to make the OLED display work, the libraries are the following:
Adafruit GFX graphics
Adafruit_SSD1306
Finally just copy and paste the following code into a new Arduino file, then connect the ESP32 to the PC, select the NodeMCU-32S board and check the COM port, compile and upload the code to your ESP32.
#include <Adafruit_GFX.h>
#include <Adafruit_SSD1306.h>
#define OLED_RESET LED_BUILTIN
Adafruit_SSD1306 display(OLED_RESET);
#if (SSD1306_LCDHEIGHT != 64)
#error("Altura incorrecta, cambie en la libreria de Adafruit_SSD1306.h!");
#endif
//Imagen que se mostrara al iniciarse el código
const unsigned char PROGMEM logo [] = {
  0x00,0x00,0x00,0x00,0x00,0x00,0x00,0x00,0x00,0x00,0x00,0x00,0x00,0x00,0x00,0x00,
  0x00,0x00,0x00,0x00,0x00,0x00,0x00,0x00,0x00,0x00,0x00,0x00,0x00,0x00,0x00,0x00,
  0x00,0x00,0x00,0x00,0x00,0x00,0x00,0x00,0x00,0x00,0x00,0x00,0x00,0x00,0x00,0x00,
  0x00,0x00,0x00,0x00,0x00,0x00,0x00,0x00,0x00,0x00,0x00,0x00,0xf8,0x00,0x00,0x00,
  0x00,0x00,0x00,0x00,0x00,0x00,0x00,0x00,0x00,0x00,0x00,0x1e,0x06,0x00,0x00,0x00,
  0x00,0x00,0x00,0x00,0x00,0x00,0x00,0x00,0x00,0x00,0x03,0xc0,0x70,0x80,0x00,0x00,
  0x00,0x00,0x00,0x00,0x00,0x00,0x00,0x00,0x00,0x00,0x38,0x0f,0x00,0x30,0x00,0x00,
  0x00,0x00,0x00,0x00,0x00,0x00,0x00,0x00,0x00,0x01,0x80,0xe0,0x00,0x0c,0x00,0x00,
  0x00,0x00,0x00,0x00,0x00,0x00,0x00,0x00,0x00,0x04,0x1e,0x00,0x00,0x03,0x00,0x00,
  0x00,0x00,0x00,0x00,0x00,0x00,0x00,0x00,0x00,0x10,0x0c,0x00,0x00,0x00,0xc0,0x00,
  0x00,0x00,0x00,0x00,0x00,0x7f,0xff,0xff,0xff,0xc0,0x03,0x00,0x00,0x00,0x30,0x00,
  0x00,0x00,0x00,0x00,0x01,0x80,0x00,0x00,0x01,0x04,0x00,0xc0,0x00,0x00,0xec,0x00,
  0x00,0x00,0x00,0x00,0x06,0x00,0x00,0x00,0x04,0x13,0x00,0x30,0x00,0x07,0x07,0x00,
  0x00,0x00,0x00,0x00,0x18,0x00,0x00,0x00,0x10,0x60,0xc0,0x0c,0x00,0x30,0x39,0x00,
  0x00,0x00,0x00,0x00,0x60,0x00,0x00,0x00,0x41,0x98,0x30,0x03,0x03,0x81,0xc1,0x00,
  0x00,0x00,0x00,0x01,0x80,0x0f,0xff,0xff,0x07,0x06,0x08,0x00,0xd8,0x0e,0x01,0x00,
  0x00,0x00,0x00,0x06,0x00,0x10,0x00,0x00,0x1c,0x41,0x86,0x00,0x00,0x70,0x01,0x00,
  0x00,0x00,0x00,0x18,0x00,0x40,0x00,0x00,0x66,0x10,0x61,0x80,0x03,0x80,0x01,0x00,
  0x00,0x00,0x00,0x3f,0x01,0x00,0x00,0x01,0xe1,0x84,0x19,0x80,0x0c,0x00,0x02,0x00,
  0x00,0x00,0x00,0x20,0x1f,0xf8,0x00,0x06,0x18,0x61,0x86,0x00,0x10,0x00,0x06,0x00,
  0x00,0x00,0x00,0x20,0x00,0x00,0xf0,0x0b,0x06,0x18,0x78,0x00,0x40,0x00,0x04,0x00,
  0x00,0x00,0x00,0x3f,0xc0,0x00,0x06,0x18,0xc1,0x86,0x60,0x01,0x80,0x00,0x08,0x00,
  0x00,0x00,0x00,0x00,0x07,0xfc,0x01,0x86,0x30,0x61,0x80,0x06,0x40,0x00,0x10,0x00,
  0x00,0x00,0x00,0x00,0x00,0x00,0x80,0x61,0x84,0x1a,0x00,0x18,0x40,0x00,0x20,0x00,
  0x00,0x00,0x00,0x00,0x00,0x00,0x8e,0x18,0x61,0x8c,0x00,0x60,0x20,0x00,0xc0,0x00,
  0x00,0x00,0x00,0x00,0x00,0x00,0x89,0x86,0x18,0x70,0x01,0x80,0x20,0x03,0x00,0x00,
  0x00,0x00,0x00,0x00,0x00,0x00,0x88,0x61,0x83,0xc0,0x02,0x00,0x10,0x0c,0x00,0x00,
  0x00,0x00,0x00,0x00,0x00,0x00,0x88,0x18,0x20,0x00,0x02,0x00,0x10,0x30,0x00,0x00,
  0x00,0x00,0x00,0x00,0x00,0x00,0x88,0x06,0x0c,0x00,0x01,0x00,0x08,0xc0,0x00,0x00,
  0x00,0x00,0x00,0x00,0x00,0x00,0x88,0x01,0x83,0x00,0x00,0x80,0x0b,0x00,0x00,0x00,
  0x00,0x00,0x00,0x00,0x00,0x00,0x42,0x00,0x60,0xc0,0x00,0x80,0x04,0x00,0x00,0x00,
  0x00,0x00,0x00,0x00,0x0c,0x00,0x30,0xc0,0x18,0x30,0x00,0x40,0x04,0x00,0x00,0x00,
  0x00,0x00,0x00,0x00,0x33,0x00,0x0c,0x30,0x06,0x18,0x00,0x20,0x06,0x00,0x00,0x00,
  0x00,0x00,0x00,0x10,0x40,0x80,0x03,0x0c,0x01,0x04,0x00,0x20,0x02,0x00,0x00,0x00,
  0x00,0x00,0x00,0xef,0x80,0x61,0x00,0xc3,0x01,0x02,0x00,0x10,0x03,0x00,0x00,0x00,
  0x00,0x00,0x00,0x83,0x00,0x1e,0x00,0x30,0xc1,0x01,0x00,0x18,0x01,0x00,0x00,0x00,
  0x00,0x00,0x01,0x01,0x00,0x00,0x00,0x0c,0x31,0x20,0x80,0x08,0x01,0x00,0x00,0x00,
  0x00,0x00,0x01,0x01,0x00,0x00,0x01,0x03,0x0f,0x10,0x40,0x04,0x00,0x80,0x00,0x00,
  0x00,0x00,0x01,0x83,0x00,0x00,0x06,0x00,0xc3,0x0c,0x20,0x04,0x00,0x80,0x00,0x00,
  0x00,0x00,0x00,0xc6,0x00,0x00,0x18,0x00,0x30,0x02,0x10,0x02,0x00,0x40,0x00,0x00,
  0x00,0x00,0x00,0x38,0x00,0x00,0x60,0x00,0x0c,0x03,0x08,0x01,0x00,0x40,0x00,0x00,
  0x00,0x00,0x00,0x00,0x00,0x01,0x80,0x03,0x03,0x0c,0x84,0x03,0x00,0x20,0x00,0x00,
  0x00,0x00,0x00,0x00,0x00,0x06,0x00,0x06,0x00,0xf0,0x42,0x0c,0x00,0x20,0x00,0x00,
  0x00,0x00,0x00,0x00,0x00,0x18,0x00,0x04,0x00,0x00,0x21,0x30,0x00,0x10,0x00,0x00,
  0x00,0x00,0x00,0x00,0x00,0x60,0x00,0x04,0x00,0x00,0x18,0xc0,0x00,0x10,0x00,0x00,
  0x00,0x00,0x00,0x00,0x01,0x80,0x00,0x04,0x00,0x00,0x0c,0x40,0x00,0x70,0x00,0x00,
  0x00,0x00,0x0f,0x00,0x06,0x00,0x00,0x04,0x00,0x00,0x02,0x20,0x03,0x10,0x00,0x00,
  0x00,0x00,0x30,0xc0,0x18,0x00,0x00,0x04,0x00,0x00,0x01,0x10,0x0c,0x30,0x00,0x00,
  0x00,0x00,0xc0,0x30,0x20,0x00,0x00,0x04,0x00,0x00,0x00,0x88,0x30,0xc0,0x00,0x00,
  0x00,0x03,0x00,0x0c,0x80,0x00,0x00,0x0c,0x00,0x00,0x00,0x65,0xc6,0x00,0x00,0x00,
  0x03,0xec,0x00,0x02,0x00,0x00,0x00,0x10,0x00,0x00,0x00,0x32,0x18,0x00,0x00,0x00,
  0x06,0x18,0x00,0x00,0x00,0x00,0x70,0x40,0x00,0x00,0x00,0x08,0x60,0x00,0x00,0x00,
  0x0c,0x08,0x00,0x00,0x00,0x01,0x9d,0x80,0x00,0x00,0x00,0x05,0x80,0x00,0x00,0x00,
  0x08,0x08,0x00,0x00,0x00,0x03,0x06,0x00,0x00,0x00,0x00,0x02,0x00,0x00,0x00,0x00,
  0x0c,0x18,0x00,0x00,0x00,0x02,0x06,0x00,0x00,0x00,0x00,0x00,0x00,0x00,0x00,0x00,
  0x06,0x10,0x00,0x00,0x00,0x02,0x06,0x00,0x00,0x00,0x00,0x00,0x00,0x00,0x00,0x00,
  0x03,0xe0,0x00,0x00,0x00,0x03,0x04,0x00,0x00,0x00,0x00,0x00,0x00,0x00,0x00,0x00,
  0x00,0x00,0x00,0x00,0x00,0x01,0xd8,0x00,0x00,0x00,0x00,0x00,0x00,0x00,0x00,0x00,
  0x00,0x00,0x00,0x00,0x00,0x00,0x60,0x00,0x00,0x00,0x00,0x00,0x00,0x00,0x00,0x00,
  0x00,0x00,0x00,0x00,0x00,0x00,0x00,0x00,0x00,0x00,0x00,0x00,0x00,0x00,0x00,0x00,
  0x00,0x00,0x00,0x00,0x00,0x00,0x00,0x00,0x00,0x00,0x00,0x00,0x00,0x00,0x00,0x00,
  0x00,0x00,0x00,0x00,0x00,0x00,0x00,0x00,0x00,0x00,0x00,0x00,0x00,0x00,0x00,0x00,
  0x00,0x00,0x00,0x00,0x00,0x00,0x00,0x00,0x00,0x00,0x00,0x00,0x00,0x00,0x00,0x00,
  0x00,0x00,0x00,0x00,0x00,0x00,0x00,0x00,0x00,0x00,0x00,0x00,0x00,0x00,0x00,0x00,
};
#include <Wire.h>
#include <Adafruit_MLX90614.h>
Adafruit_MLX90614 mlx = Adafruit_MLX90614();
/****************************************
*Funciones principales
****************************************/
void setup() {
display.begin(SSD1306_SWITCHCAPVCC, 0x3C);
display.clearDisplay();
display.drawBitmap(0,0,logo,128,64,1);
display.display();
delay(500);
mlx.begin();
}
void loop()
{
Oled_mlx(); //Función para la oled y el sensor
}

void Oled_mlx() {
display.clearDisplay();
display.setTextSize(2);
display.setTextColor(WHITE);
display.setCursor(0,0);
display.println("T_Ambiente");
display.print("   ");
display.println(mlx.readAmbientTempC()); //mlx.readAmbientTempF()
display.println("T_Objeto");
display.print("   ");
display.println(mlx.readObjectTempC()); //mlx.readObjectTempF()
display.display();
}
نظرات (0)

دیدگاهها
هیچ دیدگاهی برای این محصول نوشته نشده است.